INSTALLING SOFTWARE
Software installation is making software available to and useable by a computer. It essentially involves copying of program (s) from a removable medium (often CD) to the local or resident disk (usually the hard disk) on a host computer. In installing software, program files and folders are copied to the resident disk and registry entries made for proper recognition and use of the software by Windows.
Most software, these days is supplied by the developers and sellers on either a CD Rom or DVD Rom. Recently, flash drive or memory stick has begun to gain popularity as installation media.
The most common forms of software installation on a pc are:
- OS (Operating System e.g. Windows) Installation.
- Application Software Installation.
- Device Driver Installation.
Installation of Operating System (OS)
Installing an operating system such as Windows is an involved and time consuming task. It requires adequate preparation and attention to details. You can install an os from a network drive or installation media like CD Rom or flash drive.
Kinds of Windows (OS) installation
Installing Windows may be:
- Clean Install: fresh Installation of Windows on a blank disk or a disk formatted to become blank.
- Upgrade: installing one version of Windows over an earlier one e.g upgrading Win 8 to Win 10. This maintains old files and programs on the system.
- Repair Install: Re-Installing to correct for defects that might have developed during previous usage or installation of the OS.
Since Windows is the most commonly used OS, subsequent discussion will be for Windows installation.
General Tasks in Installing OS
Installing Windows involves two major steps:
- Preparation
- OS Install Proper
PREPARATIONS
Preparations include:
- System Compatibility Check
- BIOS Setup
- Disk Preparation
System Compatibility Check
This involves checking your computer to ensure it has the minimum features required to be compatible with the version of OS (in this case, Windows) being installed. These minimum features required for a system to be able to work with a given version are often referred to as System requirements.
Before beginning to install Windows ensure the following:
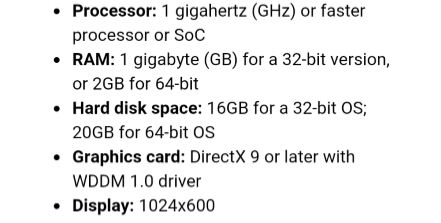
- That your hard disk or system resident drive (e.g.solid state drive, SSD) has enough space to accommodate Windows and extra for applications and device drivers. Disk space requirements etc. for Windows 7, 8/8.1, 10 is given below.
- The system must be of the right speed in GHz.
- That it has other required capabilities as detailed below.
System requirements for Win 7, 8/8.1 & 10 below:
BIOS setup
Ensure to make your BIOS settings compatible with required installation viz:
- Change boot order in the BIOS Setup to make CD Rom or your bootable drive first boot device (if installation will be from cd/dvd or flash – which is often the case these days). To learn how to do this, see the post on BIOS setup
- Enable UEFI if your system has the capability.
- For some laptops, you may need to specifically activate the Win 8.x option when upgrading to Win 10.
Disk Preparation
Disk preparation involves partitioning and formatting the disk on which installation is to be done. Partitioning may not be required for a disk in most cases except where existing partition (s) has problems or there is need to clean out the disk thoroughly in the event of a security breach or problem virus attack that refuses to clean out by mere formatting.
You may create two or more partitions or leave the entire disk space as a single partition. Some users prefer to have two partitions; one for Windows and programs, the other for their personal files, pictures and video.
You may need to delete old partitions or create additional partitions.
After partitioning the disk you need to format it to make it capable of accepting Windows or whatever OS you are installing. Fortunately, Windows automatically formats the drive when you click Next to continue after creating a partition.
You can create partitions and format them when the Windows installation process has begun as we shall see later.
CLEAN INSTALLING WINDOWS 7
- Insert Win 7 boot disk (DVD or USB Flash drive) and power on the computer.
- Watch out for the system’s prompt to press any key to boot from CD, press any key thus:

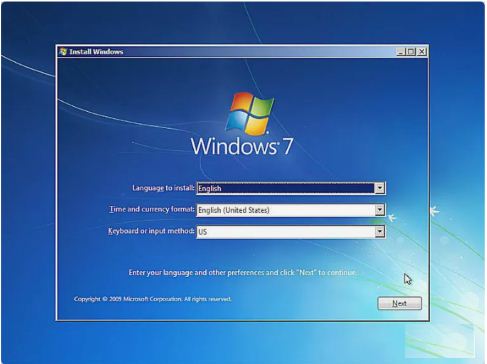
- Wait while set up inspects your system and loads files from the CD Rom. You will be presented a series of “Starting Windows screens” like these:


- In the first prompt screen, click to Choose the Language, Date and Time Format and your region. You may ignore these if you use English language and set later after installing Windows. Click Next.
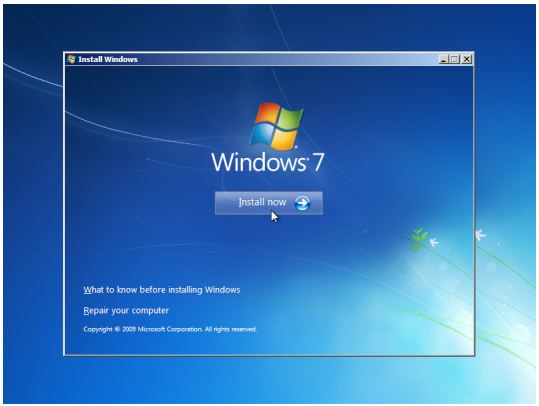
- In the next screen, click “Install now”
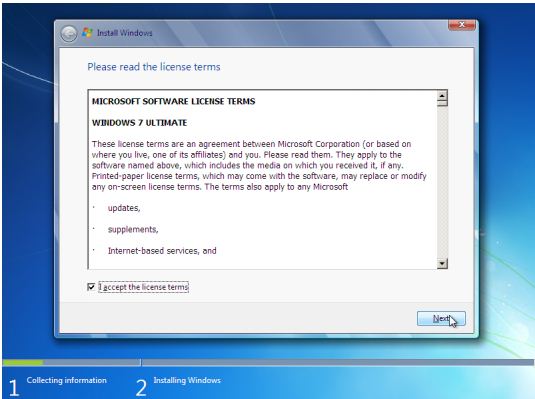
- On the Licensing Page, click the small check box at the bottom left side of the box to accept Microsoft Licensing terms. Click Next
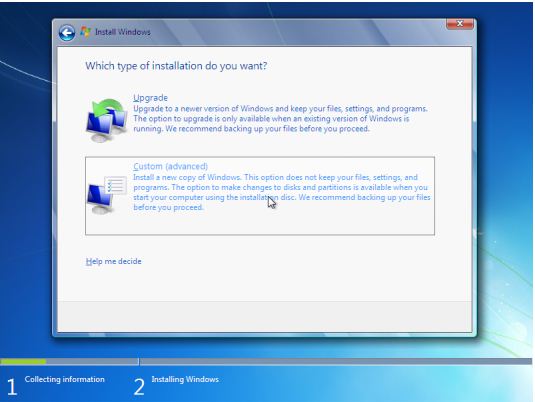
- In the next screen, click on Custom to do a clean install.
- In the next screen, select the disk (where there is more than one) that you will like to Install Windows 7 on by clicking its line in the box showing list of Disks as Disk 0, Disk 1 or Primary 0, Primary 1 with details of size and free space available shown along the same line.
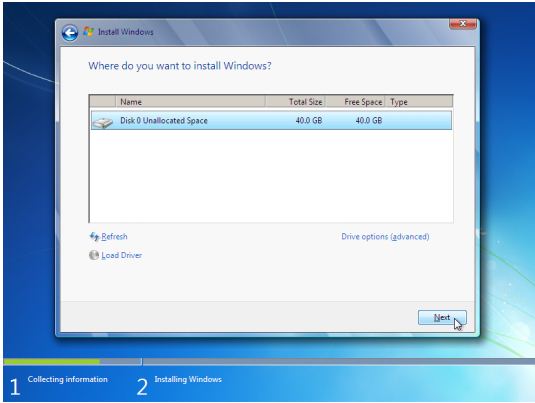
To create partitions or format the disk, Click “Advanced Options” to the right at the bottom of the box in the screen. or To continue installing Windows without partitioning or formatting disk (most disks are pre-formatted anyway), click Next.
- From this point on Windows 7 continues installing by itself providing you feedback of stage of the installation as shown in the screen below. This is automatic and requires no effort on your part. Wait for about 10 – 40 minutes that it takes to complete installation depending on the speed of your system.

When it completes loading, Windows will ask you to restart or if you dont, it will restart after 10 seconds.
- On restarting, new screens will invite you to give a name to your Windows, set up password (if you need it) and few other options. The following screens are those:


Answer appropriately by clicking your desired options or skipping as may be required. You will also have to enter the Windows product key to validate your Windows. Check the casing of your DVD and type in the key. At each step, after the appropriate choice or entry, click next or skip as appropriate for each screen.


When you have provided needed information and options, Windows then proceeds to presents the desktop. You are home. Windows ready to use.
- When Windows has booted to desktop, you can now install any required drivers and application software.
You may like to also read:

Pingback: Firmware – BIOS & CMOS | Acadamania